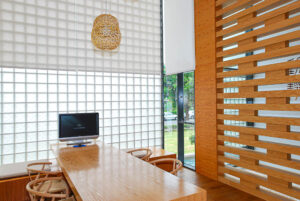
Mortarless Glass Brick Wall. A glass brick wall is a beautiful addition to any home. From the outside, it has a modern and sleek look that can’t be matched by other materials. From the inside, it provides natural light and a unique design element that will make your living space feel more open and inviting. Glass brick has been relied upon in recent years by professional architects and designers to create stunning building facades, fashion house storefront designs, bold focal points and functional office partitions.
For homeowners, glass brick walls can provide a sophisticated aesthetic appeal while enhancing the home’s natural light and ensuring its occupant’s privacy. Installing one might seem intimidating at first, but with this step-by-step guide, practically anyone can install a beautiful, mortarless, glass brick wall with ease.
Plan Your Glass Brick Wall Design
As with all home design projects, proper planning and preparation are vital for ensuring quality results that last for years. This is especially true for any glass brick or glass block construction. For glass brick, be sure to use it appropriately and not out of the scope of its intended use.
Key First Steps of Good Glass Brick Design
- Only use glass brick as a curtain or dividing space, not for structural support.
- Never use glass brick as a substitute for a load-bearing wall.
- Consider the structural resistance of the supporting floor or ground material.
- Only used as an isostatic structure.
- Allow for a distance of 6mm on either side of the glass brick wall to accommodate the material’s natural expansion and contraction variances.
- Do not build two glass brick walls beside each other.
- Ensure the supporting material is level and free from uneven finishes.
What tools and supplies do I need to install a glass brick wall without mortar?
When using materials from the Vetropieno line of glass bricks, be sure to have the necessary supplies ready before starting the project:
For Mortar-Free Installations:
- Vetropieno® glass brick.
- VetroKwik™ layout modules.
- VetroKwik™ interlocking modules.
- Rubber mallet
- Anchor supports
How much glass brick will I need for my project?
When determining how much glass brick is needed to complete your project, refer to the following guidelines:
- Measure the space where you are installing the glass brick wall. Both height and width are crucial information to determine the amount of glass brick to order accurately.
- Determine the area of the wall by multiplying the length of the wall by its height.
- Divide the calculated wall area by the area of your chosen glass brick. For Vetropieno bricks, the dimensions can be found here.
Should I anchor a glass brick wall?
Yes. While a glass brick wall is self-supporting, it must be properly anchored to the floor and at least one structurally supported wall. Stainless steel flathead screws can be used to secure the base layer to the floor and vertical sides must be secured with a running bond adhesion compound.
Please also note this is for interior applications only and not wet areas. Before any installation project, be sure to contact your sales representative for precise instructions ideal for your specific project.
Do I need mortar to install a glass brick wall or shower?
No. With the Vetrokwik™ glass brick installation system, no mortar or cement is required. The innovative polycarbonate grid system used for installing glass bricks from the Vetropieno™ series is a mortar-free installation method.
When using the VetorKwik™ system, no special tools beyond a rubber mallet are required. It uses precision modules that easily snap together and are available in three different color finishes to create the authentic look and feel you seek.
7 Steps to Install a Mortarless Glass Brick Wall
- Prepare the space you are working in and gather your supplies. Ensure to keep a clear walking path throughout the area and avoid stacking uninstalled glass bricks more than 18″ high.
- Confirm the flooring where your glass brick wall will sit is level and free of debris or uneven surfaces.
- Using the VetroKwik system, lay out the bottom row of your wall using pieces of interlocking layout modules and snap them together. Use a rubber mallet to ensure the components are connected well.
- Create the rest of the first layer’s template by connecting the 3-sided interlocking modules to the bottom layer of your wall. This creates sections for individual pieces of glass brick to be inserted.
- Starting at the end of the wall, slide a glass brick into a space. Use the rubber mallet to push the brick in entirely.
- Place the Block Alignment Tool (BAT) along the backside of the glass brick and hammer the glass brick into position using the rubber mallet.
- Repeat until the glass brick wall is complete.
Consult Quality Glass Block and Window for Your Glass Brick Wall Design
For expert advice, tips on how to design, plan and execute your custom glass brick wall project, reach out to our team. Contact us on our website or call us directly at 1-(815) 416-0007. We’re happy to answer any questions you may have and look forward to making your next design project be a success.


Give us a follow!